Gravity Forms lets you use merge tags within their Text Confirmations out-of-the-box, meaning use the visitor's name or e-mail in the confirmation message. (ie: Thanks for signing up Paul!)
However they DO NOT provide an out-of-box solution to using merge tags within Page Confirmations, meaning directing people to a separate confirmation / success / thank you page. As much as I love Gravity Forms, that's a basic feature that's been missing for years.
Text Confirmations are not always the best solution. There are a thousand reasons why you'd want to use a Confirmation Page instead, like for delivering long form content, using tracking code for Google Analytics, Facebook Ads, Google Ads, sending visitors to a different domain, etc.
Most of the tutorials online either tell you to edit your functions.php file following developer instructions (which is not recommended) or point you towards GravityWiz — which looks like a fine plugin, but way too expensive for just this one feature. So today I'm going to teach you how to input merge tags WITHOUT editing your functions.php file and instead using a code insertion plugin. Using a plugin is recommended, even if you know how to edit functions.php, because the code will remain even after your theme auto-updates (which normally erases your functions.php edits).
How To Use Merge Tags on Gravity Form Confirmation Pages Using A Plugin
Step 1: Purchase and install Gravity Forms if you haven't already, and create your first form. Also go ahead and create a new Page called “Success” or “Confirmation” (or whatever you'd like). I'm assuming you've already done that if you're here.
Step 2: Install the Code Snippets plugin for WordPress by Code Snippets Pro.
Step 3: Click “Add New Snippet” within the plugin dashboard.
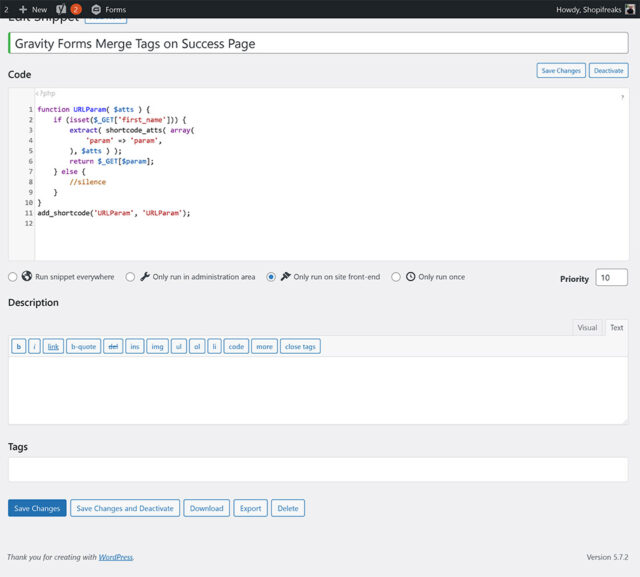
Step 4: Copy / paste the code below into a new snippet so that it looks exactly like it does in the screenshot. Be sure to choose “Only run on site front-end” and then click Save. Thank you Marcus Zeal from Zealoussites.com for the code.
function URLParam( $atts ) {
	if (isset($_GET['first_name'])) {
		extract( shortcode_atts( array(
			'param' => 'param',
		), $atts ) );
		return $_GET[$param];
	} else {
		//silence
	}
}
add_shortcode('URLParam', 'URLParam');
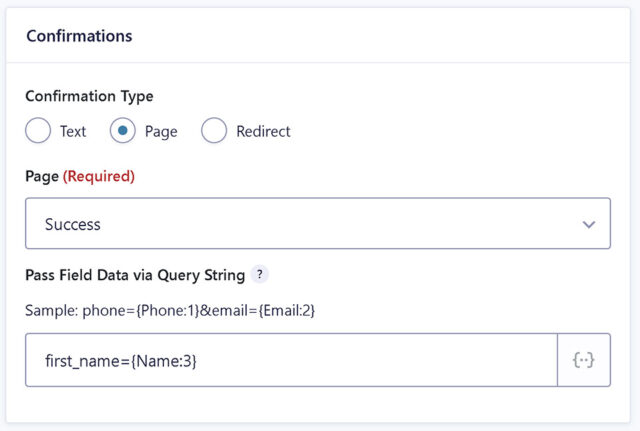
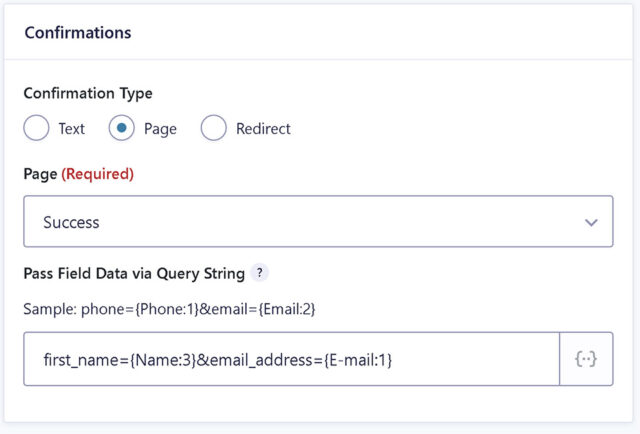
Step 5: Go to your Form Confirmation Settings and select “Page” under Confirmation Type and then select the success page you made earlier. If you haven't done that yet, you can create a New Page now and then return to these settings (or refresh the page).
Step 6: Under the field that says Pass Field Data via Query String enter the following code and then select your Name merge tag from the menu on the right of the field. Then click Save.
first_name=Here's an example below, but remember yours might not say “{Name:3}” afterwards. It'll say whatever your form's particular merge tag name is.
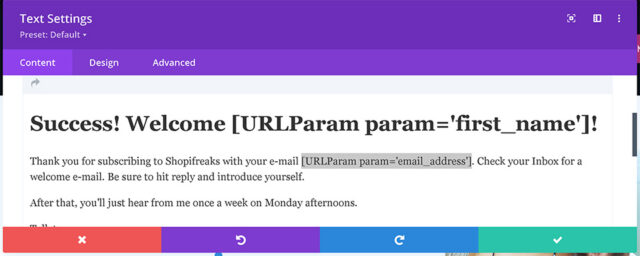
Step 7: Edit your Success Page and enter the shortcode below in place of where you'd like the visitor's name to appear. I'm using Divi Editor, so yours might look different than the screenshot below.
[URLParam param='first_name'] 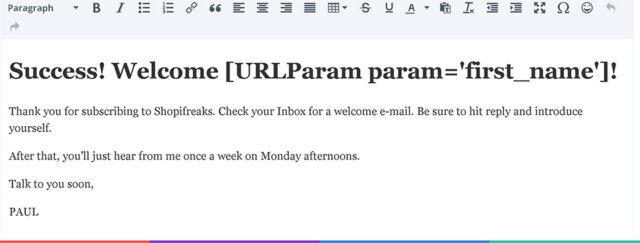
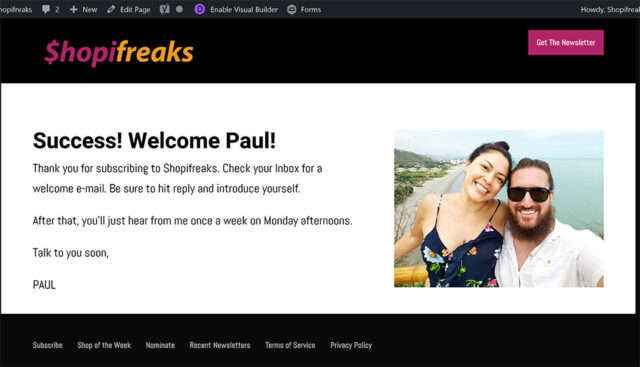
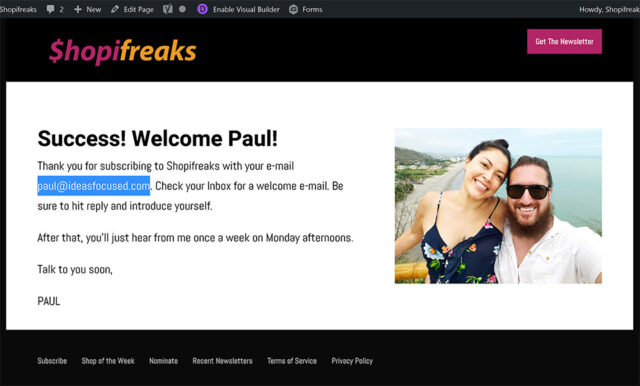
Step 8: Save your success page and test your form. The success page will now display the visitor's first name.
What about inserting merge tags other than the first name?
Using the steps above, you can create as many shortcodes as you'd like for any merge tag on your form. For example, if I also wanted to include the user's e-mail address on the confirmation page (which you probably shouldn't for privacy reasons), I could just create a separate shortcode for that merge tag. See below.
My code snippet would look like this:
function URLParam( $atts ) {
	if (isset($_GET['first_name'])) {
		extract( shortcode_atts( array(
			'param' => 'param',
		), $atts ) );
		return $_GET[$param];
	} else {
		//silence
	}

	if (isset($_GET['email_address'])) {
		extract( shortcode_atts( array(
			'param' => 'param',
		), $atts ) );
		return $_GET[$param];
	} else {
		//silence
	}
}
add_shortcode('URLParam', 'URLParam');
I'm basically just adding a new if function to my previous snippet, which I can name anything I'd like. In my case I just called it email_address for the example (because I only had one other field on the form to play with).
My confirmation page settings would look like this:
See how I'm just adding &email_address= and then inserting the e-mail merge tag for that particular form?
Then I insert my new shortcode into the page:
And lastly here's what the new success page looks like with both merge tags in use:
I highlighted the e-mail address to make it easier to see the difference.
Summary
You're creating a shortcode using that PHP code above for any merge tag you'd like. You can call the shortcodes first_name, last_name, email_address, message, date, text_field_1, etc. The sky's the limit.
Then within your Confirmation Pages Settings on Gravity Forms, you assign those shortcodes to their respective merge tags. Something like: first_name={Name:3}&email_address={Email:2}&date={Date:2}
Finally you input your shortcode into your pages, which would look like this:
Hey [URLParam param='first_name'] - I sure love your e-mail address [URLParam param='email_address']! I hope you have a great day today which is [URLParam param='date']. Hope that helps!

Hi, thanks for a great post. I followed the link from your previous post about pre-filling Calendly from GravityForms. I have that original method working great via the Confirmation Message.
However, like you I would prefer to use an actual page for the Calendly embed.
Following this guide I’m able to get the data to display on the thank you page via shortcodes as shown above. But I’m not clear how to pre-fill the embedded Calendly form. I thought I’d just add the same code as I was using for the Confirmation Message but embedded on the thank you page. It doesn’t seem to work though.
Any advice would be much appreciated! Thanks again.
It’s been a while since I posted this so I just read through both posts.
What I’m guessing is happening is that you’re using the Gravity Forms Merge Tags within Calendly code? If so replace that with the new shortcode you made like “[URLParam param=’first_name’] “.
Just a guess though.
Thank you! This worked for me perfectly.
For those using WP Code Snippets, make sure you select “PHP Snippets” and select “Frontend Only”
Also, leave the insert method as “Auto Insert” if you want to use this method provided by the author.
Good luck!
Thsi is awesome! I just can’t get it to work for dropdown fields. I tried specifying the label (:id:label) and field (:id:value) but that didn’t work. Does the snippet need to be adjusted to include dropdown fields?
Scratch that, it does work for dropdown! I made a silly mistake. Thanks so much, this is so helpful!
This works perfectly! Thank you! I was pushing back against buying GravityWiz for the one function but there’s no need as this works very well.